Breakfast indecision.

20130329-085630.jpg

Yield: 1 serving
Nutrition
Calories: 408
Fat: 12 g
Sodium: 69 mg
Carbs: 57 g
Fiber: 5 g
Sugar: 26 g
Protein: 21 g

Ingredients:
1 pineapple chobani 2% yogurt (6 oz)
1/2 cup dry oats
10 g raisins
10 g slivered almonds
Stevia to taste
1/2 cup water, or enough to cover the oats.
Place oats, raisins and almonds into a cereal bowl with the water. Mix it up and add in the yogurt. Then taste and see if you need sweetener. I used a little bit of stevia, maybe a tsp. You can do this before your shower and let the oats sit in the fridge, or eat it immediately like I did! I couldn’t wait! I got the idea from Christians breakfast, leftover oatmeal from yesterday and Greek yogurt. We both loved every bite of ours 🙂

Gluten Free Pumpkin Bread

Gluten Free Pumpkin Bread

IMG_4826

This is such a beautiful bread.

 I know, I know! It’s not fall anymore and therefore the craze for pumpkin is way,waaaaay over! Well spring had sprung, and then it decided to snow 10 inches in Saint Louis over this past weekend. So I decided pumpkin bread was the only solution! Ignore the seasons, just like nature, and make pumpkin bread while the snow falls! I recently bought some all-purpose gluten-free flour in hopes of creating something delicious for my gluten-free friends. I am a gluten-free flour novice and thought that an all-purpose baking blend was as good a choice of flours as any to start with. I am going to venture into others as soon as I use up this bag. Which certainly won’t be long with this recipe around!! I am usually counting every calorie like a miser counts his gold, (think: Scrooge hoarding his gold coins, that’s me, seriously), but I really wanted this bread have a good texture and wasn’t sure how my usual baking method (zero oil, sub greek yogurt) would work with the new flour. I used a bit of coconut oil and holy moly did it turn out great!! I hope you all try this and tell me what you think. Any tips/variations on flours would be helpful too. I would love to do more gluten-free/paleo baking. This may have been my first endeavour, but it certainly won’t be my last!

IMG_4861

C and I, playing in the snow the day after it fell. It had already melted a ton!

Yield: 10 Servings, each 81 grams

Nutrition per serving

Calories: 165.6

Fat: 7.8 g

Sodium: 300 mg

Total Carbohydrates: 20.3 g

Fiber: 3.6 g

Sugars: 5.1 g

Protein: 4.9 g


Ingredients

¼ cup coconut oil

½ cup baking stevia

3 whole eggs

2 tsp vanilla extract

1 ¼ cup canned pure pumpkin puree (Libby’s, always)

½ cup unsweetened applesauce

¾ cup water

4 Tb dry buttermilk

1 ¾ cup all-purpose gluten-free flour (I used Bobs Red Mill brand)

1 ½ tsp gluten-free baking powder

½ tsp baking soda

1 ½ tsp ground cinnamon

½ tsp ground nutmeg

¾ tsp kosher salt

IMG_4816

Dry buttermilk is great way to add lightness to your baking recipes.

  •  Preheat oven to 350°.
  • Coat a loaf pan with coconut oil or non stick spray. I lined the bottom of my pan with parchment so it would come out easily. Worked like a charm.
  • IMG_4818

    I took this picture after adding the eggs. It was depressing not being able to actually cream sugar and butter, but hey, big calorie and health savings.

    In a large mixing bowl attempt to cream together your stevia and coconut oil. I say attempt because they don’t really cream like butter and sugar would. I used a whisk and did my best.

  • Add in your 3 eggs and vanilla extract and continue whisking.
  • Add in the applesauce, pumpkin puree and water.IMG_4819
  • In a medium mixing bowl stir together the dry ingredients: gluten-free flour, baking soda, baking powder, dry buttermilk,cinnamon, nutmeg and salt.IMG_4817
  • IMG_4820

    mix slowly until…

    IMG_4822

    voila! batter!

    Combine wet and dry, adding the dry to wet a little at a time.

  • Pour batter into prepared loaf pan.IMG_4824
  • Bake uncovered for an hour, then test for doneness by piercing with a knife or toothpick. If it comes out clean, its done. If not and it starts browning too fast, tent lightly with aluminum foil. Mine never needed tenting and its total cooking time came to an hour and 13 minutes.
IMG_4825

Ok, I need to make more of this. Right now.


Pumpkin is like crack to me. I ate the whole thing (practically by myself!) in about 2 days! I usually freeze any baked good within a day of making them so that they don’t go bad. I couldn’t bring myself to do that to this deliciously dense and moist bread! It looked nothing like a healthy food and I was enthralled! Christian thought it was pretty darned good too and did his part helping me take the whole pan down! It was great straight out of the oven, but even better the next day toasted and spread with coconut oil and honey. Mmmm…bliss. I will warn you that because of its lack of sugar (preservative) it should be refrigerated with a day or so of making to discourage any bacteria from growing.


*I thought this bread was wonderful! It was a lot like Starbucks in density, texture, and flavor. Which was exactly what I was going for. However the stevia wasn’t quite up to the sweetness level that I prefer in my pumpkin bread. I am going to try adding a bit of honey or date paste next time I make this. I might also amend the stevia to ¾ of a cup and see how that goes.IMG_4835


What’s for lunch?


Tuna my way.

Canned tuna can be a super easy and quick way to put a lunch together for yourself that is tasty and filling. If you like tuna that is. If not, you’re out of luck on this one. I make mine with diced apples, celery and caraway seeds. I use light mayo and a lot of lemon juice, salt and pepper too. I love the caraway seeds because I used to eat tuna on rye, but since I have cut most bread from my diet I usually just use romaine hearts to eat my tuna in. Little tuna lettuce wraps that still have the rye flavor mixed in. I love it. Yesterday I had mine with just some baby carrots that my wonderful mother in law brought me from her food co-op. (She is always bringing me her extra produce and I love it!) I also stuck some leftover avocado into my tuna and it really added some creaminess to it.

Yesterdays lunch breakdown:

Romaine: 5 large leaves

1 can solid white tuna (starkist)

1 Tb Light mayo

1.1 oz avocado

78 g celery, about 2 sticks

3 oz apple diced, about 1/3 of a medium fuji

lemon juice of half a lemon, salt, pepper and 1 tsp caraway seeds

3 oz baby carrots

lots of water!

Total calories: 341

Jalapeno Gorgonzola Turkey Meatloaf… now thats a mouthfull!


I’ve made very few meatloafs (meatloaves?) in my life. I like them, but it never pops into my head when I’m thinking “what the heck am I going to make for my dinners this week?” I would like to start changing that. Growing up I always had the standard ground beef meatloaf with ketchup on top. Don’t get me wrong, I love it that way! However since I’m trying to be a health conscious person, I figured I would try to make mine a bit less fat and cholesterol laden. I also happened to have gorgonzola cheese, quinoa and jalapenos sitting in my fridge getting old. (does gorgonzola even get old? I mean, it’s already moldy, right?) My first attempt at this was made with ground chicken breast, and though the flavor was great, the texture was off. Next attempt was more succesful with ground turkey. So much better! I also made the cheese chunks a bit larger this time so it didn’t just blend into the meat. With larger pieces you really get the flavor of the cheese in every bite. Unless you search around and eat all your chunks of cheese at the beginning. Which may have happened. Have I told you I have a problem with cheese? It’s really a problem with loving all food, but cheese is hard for me to resist. Also, peanut butter. I can’t stand it when Christian abandons his peanut butter sandwiches. It feels like sacrilege to throw them away. Sorry about that tangent. Back to meatloaf. Try it. Enjoy it. Try it with a different cheese, such as feta, if you aren’t a fan of blue cheese. I will probably try it without the mexican spices next time. Maybe an italian version with italian herbs and chunks of fresh mozzarella or parmesan? Hmm I’m getting hungry. Enjoy this picture of Christian as you peruse the recipe.IMG_4784


Jalapeno Gorgonzola Turkey Meatloaf

Yield: 8 servings, around 132 g each (see note below)

Nutrition

Calories: 217

Fat: 11.1 g

Sodium: 212.8 mg

Total Carbohydrates: 4.4 g

Fiber: 0.9 g

Sugar: .4 g

Protein: 27.5 g

IMG_4792

I put a small plastic sandwich size baggie on my hand while dicing and seeding my jalapenos. I had some super spicy ones once that burned my hands for a few hours after cutting! It was terrible, so I now recommend gloves or the bag method.

IMG_4790

Ingredients! Onion powder not pictured. It doesn’t like the papparazzi. also, I forgot about it during the photo shoot.

Ingredients:

2 lb 93% lean Ground Turkey*

½ of a medium Onion, diced (3.8 oz)

2 medium Jalapenos (2 oz), seeded and diced (or not seeded, whatever your heat level preference)

1 whole Egg

4-6 cloves Garlic, minced

2 oz Gorgonzola or Blue Cheese, crumbled, but not too small

½ cup cooked Quinoa

1 tsp each: Kosher Salt, Pepper (fresh ground preferred), ground Cumin, Onion powder, Garlic powder, Smoked Paprika, Chili powder, ground Coriander, Worcestershire sauce

dash of Cayenne pepper (again, to your preference. I like spice, so I mayyyy have done a large dash)

2 tsp Franks RedHot hot sauce, or hot sauce of your choosing.

IMG_4794

  • Preheat oven to 350°.
  • Spray a loaf pan with non stick spray, or coat with ¼- ½ tsp Coconut oil.
  • Put the ground turkey in a large mixing bowl and add all the spices, minced garlic, diced onion, diced jalapeno, Quinoa, and Gorgonzola.
  • In a small bowl crack egg and whisk together with the Worcestershire and hot sauces.IMG_4795
  • Add the egg/sauce mixture to the turkey and slowly incorporate all ingredients. Try not to over mix, as the meatloaf can get very dense and brick like!
  • Once all the ingredient are mixed together, and you can no longer see large streaks of spices, put the meatloaf onto your prepared loaf pan. You may need to use a spatula and spread it out a little if it doesn’t by itself.IMG_4797

    IMG_4798

    Into the oven you go!

  • Place into preheated oven and bake for a little over an hour, or until internal temperature reaches 155°-160° F.
  • Let the meatloaf rest until it reaches the recommended temperature of 165°.

    IMG_4805

    Looks like a brick, tastes like heaven.

  • Slice into 8 equal portions and devour. I couldn’t stop taking little pieces from the sides of the pieces as I was portioning it out!

    IMG_4806

    Mmmm.

IMG_4810

Side dishes for Meatloaf. Steamed Brussel Sprouts and Roasted Squash(es).

*I did make this the first time with ground chicken breast and it turned out much too dense and solid. I like my meatloaf tender and the fattier turkey was perfect. You could certainly trade out the higher fat meat for lower, just be aware that the texture will change.

Paleo Pumpkin Brownies with Date Paste

IMG_4756 Pumpkin Paleo Brownies with Date Paste

I get a recipe and immediately want to change it. With paleo things I like to tweak them to make them more calorie counter friendly. They usually have waay too much oil or nut butter in them for me to eat. I love chocolatey things but was never a big fan of traditional brownies. Probably because all I’d ever had were boxed brownies that were overcooked on the outside and undercooked on the inside. not my favorite. These have made me a brownie believer. They are super moist and intensely chocolatey. Very satisfying even though they aren’t a large portion. Some days you just need a few bites to calm the craving. Some days you need the whole pan 😉

Yield: 16 small squares


Nutrition

Calories: 121.5

Fat: 7.5 g

Sodium: 162.3 mg

Total Carbohydrates: 15.6

Fiber: 3 g

Sugar: 11.3 g

Protein: 3.7 g


Ingredients

¼ cup Honey (raw or regular, or agave)

¼ cup (2 oz) Date Paste (see overnight oats post for recipe)

¼ cup Water

1 cup Unsweetened Cocoa powder

½ cup Pumpkin Puree

½ cup Unsweetened Applesauce

½ cup Almond butter (or nut butter of your choice, mine was 90 cal/TB)

2 tsp Vanilla extract

½ tsp Kosher Salt

¾ tsp Baking powder

90 g (½ cup) Chocolate Chips (I prefer dark, but milk or semisweet are fine too, milk just aren’t as flavorful)

1 Egg


  • Preheat oven to 325°
  • Grease and 8×8 baking dish with ¼ tsp of coconut oil, or nonstick spray. You can also line the dish with parchment paper if you don’t wish to use oil.
  • In a medium/small saucepan heat the honey, date paste and water over low heat, until warm and flowing.
  • Add in cocoa powder and stir until combined, be careful not to burn the cocoa powder so keep the heat very low!
  • Take the pan off the heat and add in all of the rest of the ingredients. Leave the egg and chocolate chips until last. You don’t want to cook the egg and you don’t want to melt the chips. They are a yummy little pop of chocolate when you bite into the brownie.
  • Using a spatula scrape every last drop of yummy brownie batter into your prepared pan. If you like you can sprinkle a little more kosher salt over the top of the brownies, the sweet and salt contrast is really lovely.
  • Pop your brownies into the oven and prepare to wait the longest 40-45 minutes of your life.
  • Take the brownies out and let them cool for a few minutes. This will help them to finish cooking if they aren’t quite done. I’d rather an underdone brownie than an overdone one though, so I usually can’t resist trying it immediately!
  • Slice into 16 equal squares and enjoy!

I usually weigh the entire batch and then divide by 16 for my portion size. Well I used coconut oil in the pan this time instead of parchment and then couldn’t get the brownies out without breaking them into a million pieces. So I didn’t weigh them and don’t know to the gram how large a piece should be. Next batch I’ll make sure and use parchment and weigh them out. Oh well, I think I’ll live without knowing precisely how big my piece of brownie should be!


IMG_4758

Chocolate Chip Banana Muffins, from Rissa

Banana Chocolate Chip Muffins

Yield: 18 Muffins


Nutrition

Calories: 99

Fat: 1.8 g

Sodium: 8.7 mg

Total Carbohydrates: 16.9 g

Fiber: 2.3 g

Sugar: 5.9 g

Protein: 3.8 g


Ingredients

2 Bananas

½ cup Applesauce

6 oz plain 0% Chobani Greek yogurt

1 cup Water

2 tsp Vanilla/Almond extract

1 ¼ tsp Stevia (the concentrated kind, or use ¼ cup baking Stevia)

2 ½ cups White Whole Wheat Flour

½ tsp Salt

½ tsp Baking Soda

2 tsp Baking Powder

2 Tb Dry Buttermilk

90 g (about 1/2 cup) Chocolate Chips

IMG_4697


 These are mini muffins, and roughly 3 equal one large muffin

  • Preheat oven to 425°
  • Grease muffin tins with nonstick cooking spray. You can use muffin liners, but the muffins stick to them and don’t peel off easily because of the low fat content.
  • Mix up wet ingredients.
  • Mix up dry ingredients.
  • Gently incorporate/fold the wet ingredients into the dry. Try not to over mix, just fold intil you don’t see any more flour streaks.
  • Spoon batter into the muffin tins.
  • Put muffins into the 425° oven and reduce heat to 400°.
  • Bake for 17-20 minutes or until golden and a toothpick comes out clean.


These muffins are so darn yummy! They are great as is, but you can also switch the flavorings and make them however you want. Leave out the chocolate chips and add in other things such as lemon extract and 1 cup blueberries, orange zest and 1 cup cranberries, 1 cup shredded carrots and carrot cake spices, 1 cup pumpkin puree and pumpkin pie spices (leave out one banana or it might be too wet). They are good in all these forms, I know, I’ve tried them all! You can also leave out ¼ cup of the flour and substitute ¼ cup of unsweetened cocoa and make them chocolate muffins! I’d love to try a double chocolate muffin next. I also might try and experiment with some other flours that are gluten free. That’s on my list of to-do’s for this week!

IMG_4699

Cheddar Garlic Scallion Biscuits (or muffins, whatever)

It was my sisters sons birthday today! So naturally we were hanging out at her house with our friend, Claire, and the boys were playing and we were talking about food. Duh. This is nothing new. Well, we happened to be on the subject of muffins. Savory muffins. All it took was a short trip to the kitchen to determine that we needed to make and sample an original recipe right then and there. And so it began. I am now I have something new to obsess about because these turned out great! I can’t wait to make the next batch, goat cheese and rosemary(!!!) and we’re going to try a little yeast in the dough/batter and see how that turns out. Anyway, here’s what you’ve been waiting for all your life. A healthy low cal cheddar biscuit. It has so many possibilities and combinations! Let me know if you try it a different way!

Yield: 21 muffins/biscuits

Nutrition

Calories: 78

Fat: 1.6 g

Sodium: 287.1 mg

Total Carbohydrates: 9.8 g

Fiber: 1.5 g

Sugar: 1.2 g

Protein: 5.2 g

Ingredients

2 ½ cups unbleached White Whole Wheat Flour

2 tsp Baking Powder

1 tsp Baking Soda

1 tsp Kosher Salt

2 Tb Powdered Buttermilk (this is optional, but I really think it makes for lighter biscuits and muffins)

8 oz 0% Plain Greek Yogurt

1 whole Egg

4 Scallions, chopped

2 Garlic Cloves, minced

1 cup Water

2 Egg Whites

¼ tsp Cream of Tartar

1 cup (4 oz) shredded 2% milk reduced fat Cheddar Cheese

Image

  •  Preheat oven to 425°.
  • Grease two cookie sheets with cooking spray. You can also do a combo of cookie sheet and small muffin tin like I did. Or all muffins. The muffins take a little longer to cook through, so allow for longer baking.
  • In a large mixing bowl combine the flour, baking powder, baking soda, salt, and buttermilk powder.Image My Gorgeous Sis
  • In a medium mixing bowl mix Greek yogurt, the whole egg, scallions, garlic and water.Image
  • In yet another bowl whisk the egg whites with the cream of tartar until nice and frothy, and you can no longer see unfrothed egg white on the bottom of the bowl.Image
  • Mix the wet ingredients into the dry and gently fold in the egg whites and cheddar cheese.ImageImage
  • Using a ¼ cup measure, portion out your biscuits onto your greased baking sheets or muffin tins. Mine made 21 exactly. Image
  • Put into the 425° oven and reduce temperature to 400°.
  • Bake for 17 minutes, or until the biscuits are golden and a wooden toothpick comes out clean.Image

We ate ours plain, but they’d be great with a little butter, or as a side to some soup. My sister has a creamy tomato soup that’s 56 calories a serving that they’d be amazing with. I hope you give this recipe a try. It takes no time at all, you spend more time on dishes and assembling the ingredients than cooking. The results were better than I’d hoped for and I can’t wait to try them with yeast!

Image

My mom took a picture of me earlier today when I was writing my lunch eggs post.

Image

All the boys (big and little) had a great time today playing and celebrating Rowie turning two!

Lunchtime Eggs

Today for lunch I couldn’t decide what to have. None of my proteins were appealing to me and I wasn’t in the mood for a sandwich. Since lately I’ve been eating sweet breakfasts I haven’t been going through my eggs quickly. I do love eggs, I have just been crazy about sweets and trying to get Christian to eat oatmeal for breakfast. Today however for lunch there was some very enticing goat cheese and basil just begging to be eaten. I decided that I needed goat cheese in my life, so I was going to make an egg white omelet with goat cheese, basil, hummus and red pepper. I threw on some salsa and avocado for good measure. I was mixing my food ethnicities, but it turned out to be amazing!

Image

Here it is without the salsa

Yield: 1 omelet

Nutrition

Calories: 336

Fat: 16.7 g

Sodium: 725.5 g

Total Carbs: 21.9 g

Fiber: 6.1 g

Sugar: 4.6 g

Protein: 24.2 g


Ingredients

4 Egg whites

53 g (1/2 small pepper) Red bell pepper, diced and cooked in pam

1 oz Goat cheese, crumbled

5 fresh Basil leaves, ripped up or cut into a chiffonade

2 Tb Hummus (homemade for Rowans party, and it contributed 108 cals. I usually would use a lower cal hummus, but I want to use this up)

1.25 oz Avocado, (3/4 of a half an avocado)

2 Tb Chunky Salsa


Cook your egg whites in pam or 1/4 tsp of oil of your choice. When the egg is done fold it up in half and cook the red bell pepper in the same pan until softened. Plate your egg, top with bell pepper, hummus, basil, avocado, goat cheese, and salsa. Enjoy!

“Don’t throw that away!” should be my family motto.

image

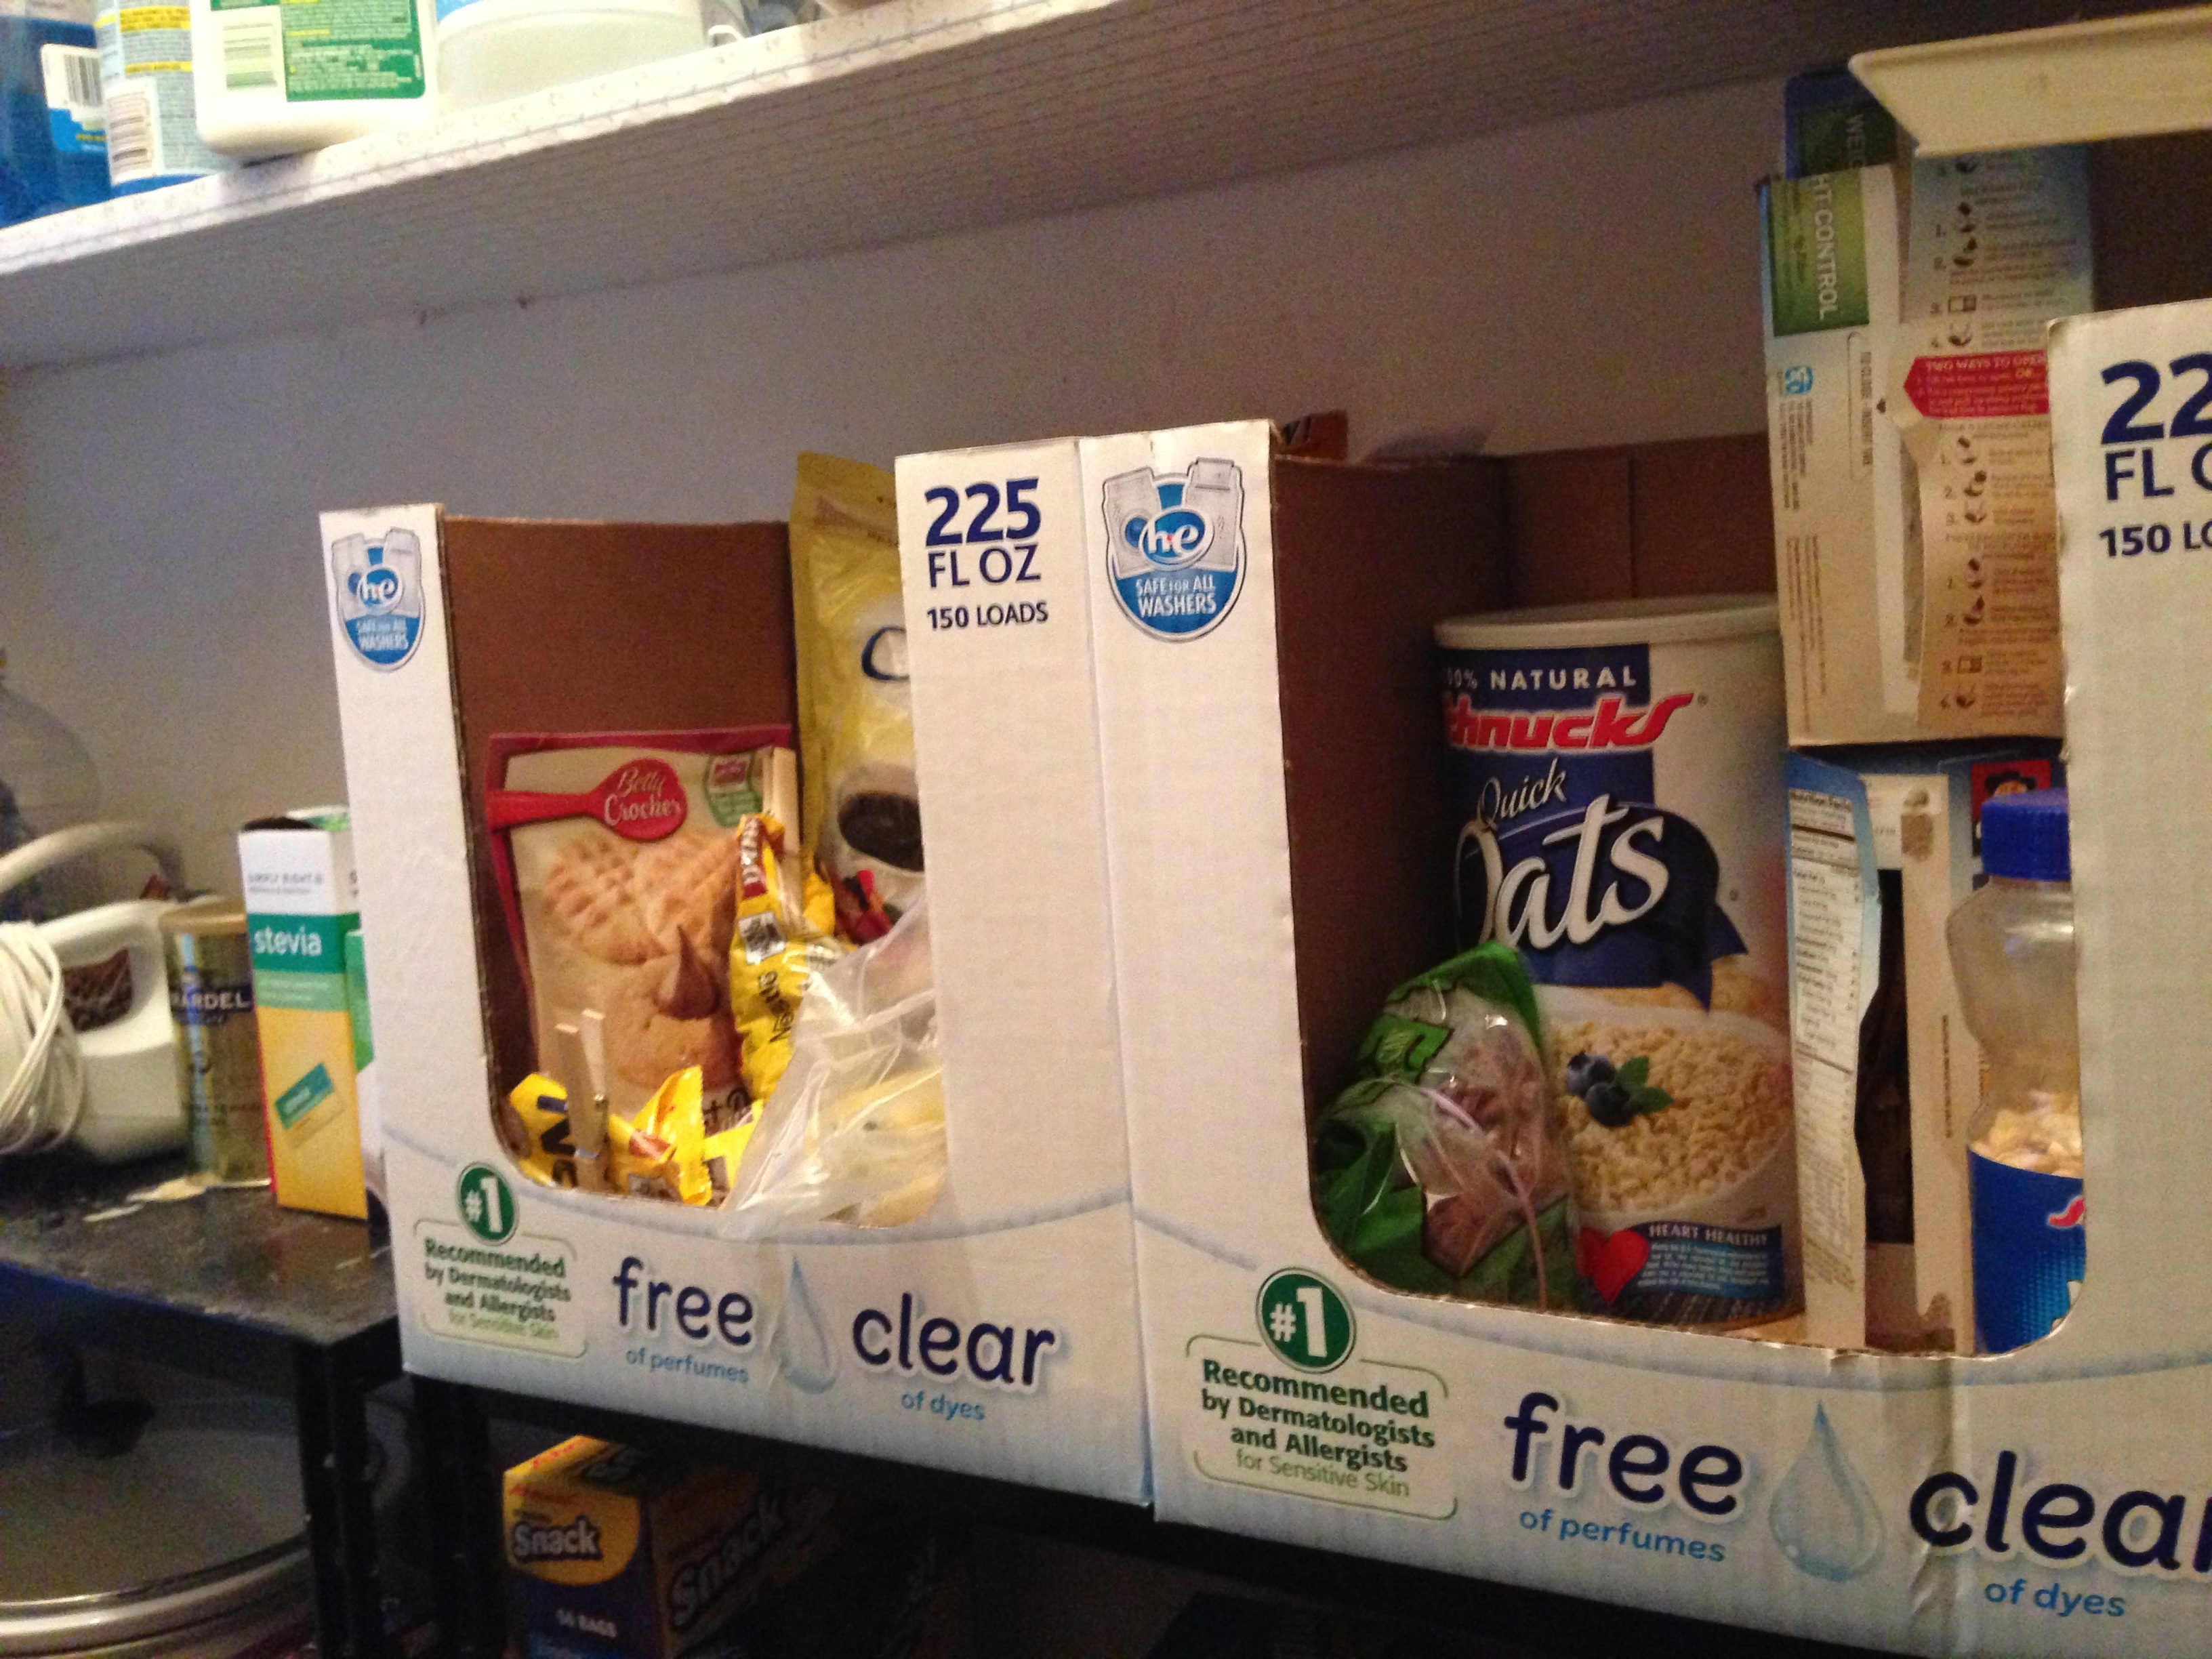
Not the most beautiful of boxes, but you get the idea! I grouped breakfast items all together and near the front of the pantry where everyone can easily grab what they need. The box to the left is baking items. Sugar, Stevia, Splenda, baking mixes, flour and chocolate chips. The essentials 😉
image

This is my sisters separate area where she keeps her son and boyfriends snacks, sodas and soups. She also keeps her own protein powders and peanut butter there so its out of any clutter that may accumulate above. Keeping certain items that only one family member eats is good if everyone in the family has ‘special’ foods. If everyone has many special foods, bins with the family members name on it would be another good storage idea.

image

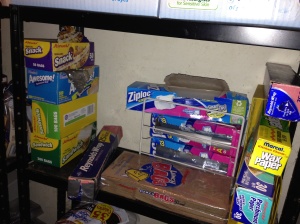
Food storage area with all wraps, and bags of different sizes.

image

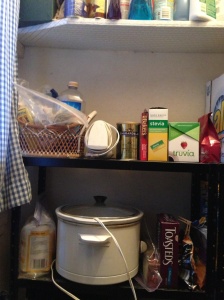
An area that still needs my attention. However the crockpot usually is stored on the kitchen counter (which I cant stand) and now it has a place!

3/17/12
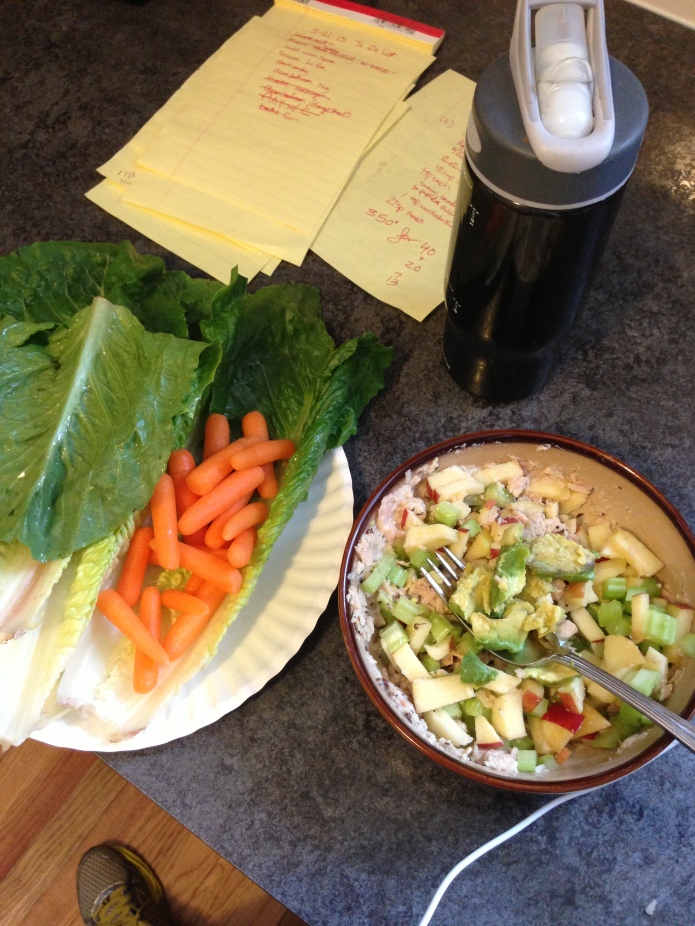
Happy St. Pat’s! The last few days I’ve been very busy helping my sister get ready for her son Rowan’s 2nd birthday party! Tons of cleaning, prepping, cooking and organizing! Not a lot of time to come up with new recipes. That’s why I love having things that pretty much make themselves if they’re properly prepped and ready. I’ve been eating lots of cooked quinoa, steamed and roasted veggies, black bean burgers (from Skinnytaste.com they’re amazing and she has weight watchers points and calories listed!)and grilled chicken breasts. I like to have these things in my fridge and ready to eat at all times! I also love having salad ingredients in my pantry and fridge. Craisins, pecans, walnuts, onion, cheese (feta, goat, blue, Parmesan) fruit (apples, pears, blueberries) olive oil, vinegar and salad greens (spinach, mixed greens, kale). Sometimes I have all of these ingredients, sometimes only two, but I love having a salad as a side or a large one with protein as my entree. Its also very helpful to have individually frozen packages of tilapia, salmon and chicken breasts , as well as cleaned, deveined shrimp in my freezer. Those all defrost very quickly and you can have a meal ready in a half hour or less with the right foods around.
M y Mother recently joined my sister and I on My Fitness Pal and has been doing an amazing job losing weight and getting active again, I am so so proud! I like to help and encourage her in any way I can. I know that having a clean, organized well stocked pantry helps when you get swamped and don’t have tons of time to run to the store for ingredients for a healthy meal. Tonight I helped clean and organize my moms pantry and I’m so mad at myself for forgetting to document the before picture! My mother, like her mother, is a saver and has a hard time letting things go. It’s easy for me to understand since I have a natural tendency towards the same behavior. I will stand in my kitchen with a package of something I haven’t used in 5 years in my hand. Debating wether to throw it out. It could be a few months from the expiration date and I’ll have used it once or never and I still have a hard time letting things go. My grandmother grew up in the depression and had to constantly scrimp to make ends meet. Throughout her life she would never throw food out. That must’ve somehow traveled through the genes to my mother and myself! We love to feed and nourish our family and friends and can’t stand the thought of something going to waste that could be used. Well we’re slowly breaking ourselves of this bad food hoarding habit!

The difficult thing about my parents spacious pantry is the fact that you can’t walk into it easily without stepping over a toddler gate. My sister, her boyfriend and their two year old son live with my parents and my parents other 3 (soon to be 4) grandchildren are constantly around. Since the kids are naturally attracted to the pantry (and it’s regular door doesn’t close) we keep the little gate up. It makes it harder to get into and many pantry things have migrated to the kitchen counters. It was time for someone to step in and reorganize/purge the pantry. My sister and I threw out about 2 full trash bags of expired, half used, and dust covered items! Now we can see what’s what in the pantry and get it organized and have  healthy ingredients easily accessible and ready for use.

Organization wise so far, I’ve put everything in groupings, mostly by food type, (ie tomato items together, all beans together, grains, together). Some foods I put near the front of the pantry so they’re in arms reach, but not sitting out on the island as they usually are. I feel so much better with this done! I’ve been trying to help my mom the entire year to de clutter her house and it’s been a rewarding task! I’m so proud of her for letting my sister and I bulldoze through her piles of Martha Stewart Living and quilting magazines with hardly a peep! We are still planning on getting some dividers and smaller shelves to keep everything more viewable. If you can’t see what foods you have, you have a tendency to buy it again if you need it for a recipe. This leads to a lot of waste, in my family at least. I’ve also recommended that my mother go into her pantry at least once a week, probably before grocery shopping, and take stock of what items she has. For me this can inspire some creative meals as I try and use up ingredients that are nearing the end of their usefulness, and stops me from buying items I already have plenty of.

We are far from finished but every small step makes a contribution to furthering our goal of living healthy, happy, productive lives!

My very own Apple Cinnamon Overnight Oats and Date Paste

Yield: 1 serving

Nutrition

Calories: 205.3

Fat: 4.3 g

Sodium: 75.6 mg

Total Carbs: 44.3 g

Fiber: 6.8 g

Sugar: 8.9 g

Protein: 5.9 g

IMG_4601

Ingredients

½ cup dry Old Fashioned Oats

½ cup unsweetened Almond Milk

50 g diced apple, about ¼ medium apple, mine were Honey crisps

¼ tsp Vanilla

¼ tsp Cinnamon

¼ oz Date Paste, about 1 ½ tsp

Mix all ingredients except apples together in an airtight container, I used little canning jars. Place the apples on top and seal. Put the oats in the refrigerator over night and voila! Next morning a delightful breakfast awaits! If you want you can always substitute Stevia or Splenda for the date paste, I just am trying out a new form of sweetener. And I love dates. I served my oats this morning with a little bit of vanilla protein powder for extra protein. It.was.amazing.

IMG_4605

Date Paste

Yield: 9 oz total

Nutrition per ounce

Calories: 62.2

Fat: 0 g

Sodium: 0.9 mg

Total Carbs: 14.6 g

Fiber: 1.6 g

Sugar: 13 g

Protein: 0.4 g


Ingredients

183 g (1 cup?) Dates,  Medjool are recommended, but I used Deglet and they’re great. And cheaper.

Water

Small canning jar

Put your dates into the canning jar, packing in the dates to the top. Cover with water, put on the lid and place in fridge and let soak for 24-48 hours. Take your dates and water (Do not Discard!) and place in your blending device of choice. Since the dates are pretty tough even after soaking I chose my hand blenders mini food processor option. You can use anything that will blend up the dates. Blend! I pulsed mine and scraped down the sides of the bowl a few times to get everything nicely incorporated. If your dates are very tough or you don’t want to soak them I would suggest measuring them and the water out and heating them up in a small saucepan until they’re tender enough to blend. Once the dates are blended up I re-measured mine to see how many ounces it made, then put the date paste back into the jar for storage. Put it in the fridge and use in whatever you want! I will be using mine mostly in baking and oatmeal/oats. I am also planning on using some to sweeten my granola I’ll be making in the next few days. I will probably thin it out with water before mixing it in with the granola. I’ll let you all know how that goes!